Overdubs

Solo Guitar Overdubs – 

This week we had to get a Solo Overdub done and an Acoustic Guitar Overdub done. We started with the Solo; we had a Fender Guitar with a Vox Valvetronix Amplifier. We used a AKG 414 (Condenser) on an Omnidirectional Polar Pattern with a Bass Roll Off of 160 Hz on the 414. As well as this we also used two SM57’s one on the centre of the Amp Cone and one just off Centre.  We tried to a the same sound as what we had already used on the other guitars because obviously if it was a lot different then everyone would notice that it would have been overdubbed in and it wouldn’t sound like it was played as a one take-whole band-type recording, you’d know that it was done in parts. Although this isn’t a bad thing and is obviously accepted in the Music Industry, it just sounds better if everything sounds like it was all played together in one take.

Acoustic Guitar Overdubs – 

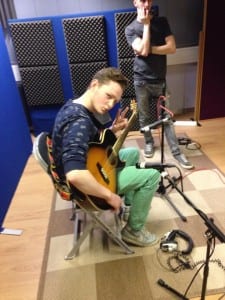
For the Acoustic Guitar Overdubs we used an ‘AB Stereo Pair Recording’ which means that we would be recording One Sound Source with 2 Microphones – so the 2 SM57’s would be used in this recording. One would be aimed at the neck of the guitar and the other would be aimed at where you strum the guitar. This way you get a nice mixture of the two sounds. We also used an AKG 414 as a Room Mic. On the Room Mic we decided to flip the phase to see if it made any difference to the sound, and because it didn’t we decided that there was no point flipping the phase. We also worked on how the strumming should go for the Acoustic Guitar – whether it should follow what the electric guitar is doing (using stabs) or just doing continuous strumming. We recorded the Guitar doing both and we all as a group decided that doing the continuous strumming would sound better on the record and then would give the song another layer.
10169167_10152919881328343_6820085669993436889_n

Vocals

This week we would be doing vocals. We had a choice of three Microphones –  AKG 414 (Dynamic), Electro Voice RE-20 (Dynamic), SM57 (Dynamic). On the 414 we put a cardioid polar pattern and we put a bass roll off on about 160 Hz, on the RE-20 we used a low shelf switch, and there were no changes on the SM57. The use of a pop shield means that you can get closer to the mic, there will be more bass in the sound doing this but it will sound more intimate and therefore when the listener listens to it they will feel more involved in the song.

Mic positioning is essential for getting a nice sound that suits both the vocalist and the song; depending on how the singer sings you might want to put the microphone off axis. Doing this will help with all the Plosives (B’s and P’s) and Fractives (F’s and Q’s).

After hearing how all three microphones, we decided to record vocals using the Electro Voice RE-20.

Time for Guitars

Time to do Guitar Tracking; for this we would be using a Vox Valvetronix Modelling Amp, two SM57’s one at the centre of the speaker and one at the edge of the cone. We would also be using a sE2200a II as a Room Mic to pick up some nice ambient room sounds to make the whole overtone of the guitar sound a bit ‘Bigger’ rather than just sounding like it’s in a medium sized room in a studio.

When choosing an Amp we went from a Medium sized amp because if we used a Smaller Amp the wattage and Speaker size would be too small and it would just sound too noisy and if we used one that was too big we wouldn’t be able to crank it up therefore it wouldn’t sound as nice because it wouldn’t be reaching it’s potential.

The Room Mic was set to Omni-Directional so it would pick up the whole room, we also turned on a Low Shelf so it reduced the low frequencies. A Low Shelf is different to a Low Pass Filter which will just cut out the low frequencies. We also set a Low Shelf on the SM57’s from the Desk to take out the low frequencies from 50 Hz and below. When positioning the SM57’s we reversed the faze but it wasn’t needed because they were inline with each other.


All about that Bass

Today was Bass day. Bass is essential to a song because as well as the drums is acts as a foundation to a song. The guitarists and Vocalists can do whatever they want to a song but if you have a sloppy Rhythm section then your whole song will just sound like it’s falling apart. There are a number of ways we can record Bass guitar – Using Mics up against the bass amp and we can also DI (Direct Injection) the bass, so that it goes straight from the amp into the desk. This minimises any interference you might get when recording using mics. DI’ing an Instrument is good when you’re recording in a loud environment and you want to cut out all excess sound that is just not needed. Using Mics to record Bass also has it’s advantages because it can help capture that live element and it can also catch the human aspect of playing an instrument, something you might lose if you just use a DI Box to record Bass. A mixture of the two (DI +Mics) will give you the best of both worlds.

The equipment that we used was an AKG D112 (Dynamic) Microphone and a AKG 414 (Condenser) Microphone and a DI Box, that I mentioned earlier. When using the 414 we need to make sure that there’s no low end roll off because we want all the low frequencies left in because Bass is obviously known for it’s low tones. Using a bright 414 against a Darker D112 (Known for being used on Bass Drums) gives us a nice mixture of the two for when we go to mix down our final product. We also used a Bass Guitar that had Hum Bucker picks ups which means it picks up less interference which makes everything easier when you come to Mix Down the final track.

When recording into Pro Tools we used a technique called ‘Pre Roll’ which means you don’t have to do a whole take it one go, you can drop into the project from any point and record from there, which makes it easier when you want to record just a chorus or just a verse so you don’t lose a good take.

Drum Day!

Today we would be tracking the drums for our track with Clementine.

We used the technique of Close Mics so you could hear more definition and Attack within the drums. With using this technique we have chosen we have to be careful of cymbal bleed because it will cause fazing and would make the recording sound messy.

As today was the first day of recording we would have to set up our session in Pro Tools, and today as I was given the job of using Pro Tools, this is what I had to do…

Set up a New Pro Tools Session on the 24in24out setting which is used for all sessions when using Studio 1, I then had to set up the Drum tracks between tracks 17 – 24 – this is where the drum room is programmed into the desk, these channels on the desk correspond to channels 1-8 in the drum room. I also had to set up a guide vocal track and a guide guitar track – these would be on track 1 and 2 in the live room. These are set up to make recording the drums that little bit easier, so it feels like you’re all playing in the same room. As well as this, I set up a Click Track on track 16 for convenience to make it easier for everyone to stay in time, however this was scrapped after a couple of takes because it was easier to play without it. I also set up an Auxiliary input for everyones headphones on Aux A.

The mics we used were:

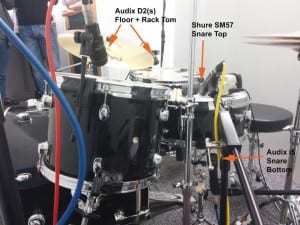
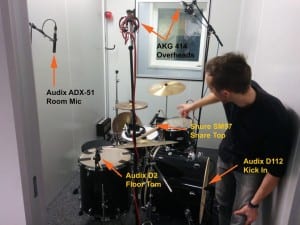
  • Audix D2 – Super Cardioid – Tom Mics – Seinhiezer V906 also good for Toms.
  • Audix I5 and SM57 – Cardiod – Snare Top and Bottom – Reverse the Faze of either Snare Top or Bottom so you can hear more of the Snare Attack
  • AKG 414 – Overhead Left and Right
  • AKG D112 – Kick Drum Mic – Good at pickup low frequency good at taking lots of SPL (Sound Pressure Level). Common Practise is two use Mics on the Bass Drum – one near the beater for the click and one near the back for the ‘Boom’
  • Audix ADX-51 – Mono Room Mic- Picking up the whole of the drum kit (Like the Overheads) this Mic ‘glues the sound together’

Drum Recording 1 Drum Recording 2