Review of my Mix

While I was doing my Mix, I encountered a few problems because I basically just took a stab at it and hoped for the best rather than slowly worked on it and I basically had to do it 2 or 3 times before I realised I needed to stop, slow down the process and basically start again.


Once I realised this, I took a step back, listened to the track a few times and then thought to myself, which tracks could I actually drop to make the overall song sound better. The first track that I took out was one of the Bass tracks – this would leave me with two Bass tracks, which would leave me with more than enough Bass to work with to make the track sound good. After I turned my attention to the guitar tracks. At first there was three two guitar tracks, an electric guitar track and an acoustic guitar track, the electric guitar had been double tracked – this means it had been recorded once, copied and then inserted into the project again. I thought that to make the song sound more authentic and less harsh on the ears, I would remove the electric guitar altogether and leave just the acoustic guitar in the song for my final mix. I feel that this was a good option because once I removed the guitar, the song sounded a lot better already and had potential to sound great, I felt that the electric guitar was holding the song back quite a bit and therefore needed to be removed.


I then edited how the song would start, I played with the idea that the first verse would come straight in and the instruments would pick up in chorus, for the rest of the song, but I could not get the transition right – I do feel if I left myself more time to do my mix, that I would have tried harder to get this idea off the ground. I then had the Bass starting the song by itself – similar to the original, but using the bass rather than the guitar; but after a few playbacks like this, I felt that there was a better way to start the song, so I settled on having the bass drum start and then all the instruments coming in together when the drums do the snare/floor tom build up.


After this it was then time to add the effects and edit each track how I wanted. The first track I went to was the solo guitar, this is because since the week we recorded it I knew exactly how I wanted it to sound, so I went there first. I used EQ so tighten the sound up rather than having loads of odd frequencies that wasn’t needed, I then turned the tracks up, so the solo was sitting just slightly above the rest of the mix – this is so it catches peoples attention and gets people listening more intently. I then turned my attention to the vocals, I liked the idea that if I put reverb on the vocals that they would sound a bit distant and make it sound like they were recorded in a big hall, so that’s what I done, however I listened back and chose to tone down the reverb so there’s just a slight reverb that is only noticeable in certain parts of the track. With the rest of the tracks, I used EQ and compression to tighten and tidy up the song so it sounded more rounded rather than rough around the edges.
Preparing to Mix

Today we were preparing our track for Mixing, basically pre-mixing, making sure all the crossfades (crossfades are what you have to do if you stop recording a part half way through then carry it on with another track and then link them together) were together and also to make sure that if there was any surgery to the tracks that needed to happen that we all done it together before we took the track away to do our final mix.

The reason you would do is in a real life situation is because normally the producer wouldn’t do the mix as well as running the recording proceedings so it gets sent to someone else. The reason you do a pre mix is so that the Mixing Engineer knows roughly what the band/producer wants from the Mixing Engineer.

Overdubs

Solo Guitar Overdubs – 

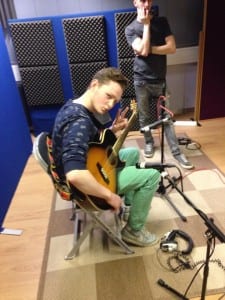
This week we had to get a Solo Overdub done and an Acoustic Guitar Overdub done. We started with the Solo; we had a Fender Guitar with a Vox Valvetronix Amplifier. We used a AKG 414 (Condenser) on an Omnidirectional Polar Pattern with a Bass Roll Off of 160 Hz on the 414. As well as this we also used two SM57’s one on the centre of the Amp Cone and one just off Centre.  We tried to a the same sound as what we had already used on the other guitars because obviously if it was a lot different then everyone would notice that it would have been overdubbed in and it wouldn’t sound like it was played as a one take-whole band-type recording, you’d know that it was done in parts. Although this isn’t a bad thing and is obviously accepted in the Music Industry, it just sounds better if everything sounds like it was all played together in one take.

Acoustic Guitar Overdubs – 

For the Acoustic Guitar Overdubs we used an ‘AB Stereo Pair Recording’ which means that we would be recording One Sound Source with 2 Microphones – so the 2 SM57’s would be used in this recording. One would be aimed at the neck of the guitar and the other would be aimed at where you strum the guitar. This way you get a nice mixture of the two sounds. We also used an AKG 414 as a Room Mic. On the Room Mic we decided to flip the phase to see if it made any difference to the sound, and because it didn’t we decided that there was no point flipping the phase. We also worked on how the strumming should go for the Acoustic Guitar – whether it should follow what the electric guitar is doing (using stabs) or just doing continuous strumming. We recorded the Guitar doing both and we all as a group decided that doing the continuous strumming would sound better on the record and then would give the song another layer.

10169167_10152919881328343_6820085669993436889_n

Vocals

This week we would be doing vocals. We had a choice of three Microphones –  AKG 414 (Dynamic), Electro Voice RE-20 (Dynamic), SM57 (Dynamic). On the 414 we put a cardioid polar pattern and we put a bass roll off on about 160 Hz, on the RE-20 we used a low shelf switch, and there were no changes on the SM57. The use of a pop shield means that you can get closer to the mic, there will be more bass in the sound doing this but it will sound more intimate and therefore when the listener listens to it they will feel more involved in the song.

Mic positioning is essential for getting a nice sound that suits both the vocalist and the song; depending on how the singer sings you might want to put the microphone off axis. Doing this will help with all the Plosives (B’s and P’s) and Fractives (F’s and Q’s).

After hearing how all three microphones, we decided to record vocals using the Electro Voice RE-20.

Time for Guitars

Time to do Guitar Tracking; for this we would be using a Vox Valvetronix Modelling Amp, two SM57’s one at the centre of the speaker and one at the edge of the cone. We would also be using a sE2200a II as a Room Mic to pick up some nice ambient room sounds to make the whole overtone of the guitar sound a bit ‘Bigger’ rather than just sounding like it’s in a medium sized room in a studio.

When choosing an Amp we went from a Medium sized amp because if we used a Smaller Amp the wattage and Speaker size would be too small and it would just sound too noisy and if we used one that was too big we wouldn’t be able to crank it up therefore it wouldn’t sound as nice because it wouldn’t be reaching it’s potential.

The Room Mic was set to Omni-Directional so it would pick up the whole room, we also turned on a Low Shelf so it reduced the low frequencies. A Low Shelf is different to a Low Pass Filter which will just cut out the low frequencies. We also set a Low Shelf on the SM57’s from the Desk to take out the low frequencies from 50 Hz and below. When positioning the SM57’s we reversed the faze but it wasn’t needed because they were inline with each other.